Deploying DPX with VMware vSphere
DPX Master Server can be deployed before or after installing the DPX Client. It does not interfere with the process in any way.
The following instructions assume you have a dedicated virtual machine host and are not deploying on your personal computer, which is used only to deploy DPX on the host.
Deploying DPX Master Server with vSphere
- Download the .OVA file from the Catalogic MySupport page:
-
Login to Catalogic MySupport using the provided credentials.
-
From the product selection tiles, select Catalogic DPX.
-
From the Installation & Upgrade section, select DPX Master Server.
![[image expected here]](/assets/images/my_support-dpx_master_server-b9b58c039db680cf769c3421e71b9db6.png)
-
Click the link to start downloading the .OVA file.
![[image expected here]](/assets/images/my_support-dpx_master_server-ova-ffcf4dc7fc98a38c9e68d0010d31e2a5.png)
-
- Once the file is downloaded, log in to vSphere.
- Right-click on the folder where you want to deploy your virtual machine.
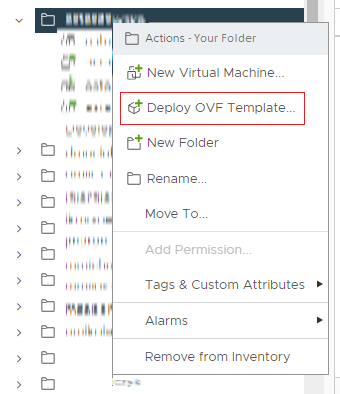
- Deploy OVF Template wizard will initiate.
OVF Template Deployment Wizard
The .OVF deployment wizard requires the following steps to be completed:
-
Select an OVF template
In this step, provide the .OVA file destination, either as a URL to a remote server or by downloading the file. In our scenario, we’ve downloaded the file. In such case, select “Local file” and browse to the file location.
Click Next. -
Select a name and folder
Specify the name for your virtual machine and its location. Please remember machine names on vCenter must be unique.
Click Next. -
Select a compute resource
Select the computer resource that will be available to your virtual machine.
Click Next. -
Review details
Verify the template details.
Click Next. -
License agreements
In this step, you must accept the license agreements.
Check the checkbox and click Next. -
Select storage
Define where the virtual machine’s disk will be stored, and choose between thin and thick provisioning. This setting determines whether all disk storage defined for the machine will be exclusively available (thick), or only the disk space actually occupied is used (thin).
Click Next. -
Select networks
Select the network for your virtual machine.
Click Next. -
Customize template
Here you are required to fill in some parameters.Hostname Configuration Hostname Please remember that hostname must be unique within the network, domain and Enterprise. Connection Configuration Provide all parameters for static IP address. Leave all blank in case of DHCP. Network IP Address Fill in, if you want to have a static IP address. Network Prefix If you want to have a static IP address, you must provide all connection parameters, including network prefix. Default Gateway The default gateway address for this VM. DNS Servers Comma-separated domain name servers for this VM. Keyboard Language Configuration Keboard Language Type in two-characer language code. Timezone Configuration Set to “America/New_York” by default. Can be changed afterwards.
Click Next. -
Ready to complete
This screen contains a summary of the previous steps. Please review all the information before you click Finish.
You have now completed the deployment of the DPX Master Server.